
Migrate Microsoft Entra Connect Sync to Cloud Sync
- Davide Cenedese
- Microsoft 365 , Entra ID
- November 8, 2025
Table of Contents
Entra ID is a foundational component for any organization leveraging Microsoft 365. As the identity provider behind Microsoft 365, it’s essential for accessing Microsoft cloud services, as there’s simply no way around it.
Given that many organizations are transitioning from traditional on-premises environments, it’s common practice to synchronize identities from on-premises Active Directory to Entra ID, ensuring a seamless and secure user experience across hybrid infrastructures. To enable this identity synchronization, organizations typically rely on Microsoft Entra Connect Sync, formerly known as Azure AD Connect. This tool has long been the standard for bridging on-premises Active Directory with Microsoft Entra ID.
However, in recent years, Microsoft introduced Entra Cloud Sync, a lightweight and modern alternative designed to simplify deployment and reduce infrastructure dependencies. Organizations now face a choice between the traditional Connect Sync and the newer Cloud Sync, each offering distinct advantages depending on the environment and requirements.
Use Case
In this article, we’ll briefly explore Microsoft Entra Connect Sync and Cloud Sync. We’ll break down their core differences, highlight scenarios where one may be more suitable than the other, and provide guidance on how to transition from Connect Sync to Cloud Sync if your organization is considering a move.
Whether you’re planning a new hybrid identity setup or optimizing an existing one, understanding these options is key to making informed decisions that align with your infrastructure and operational goals.
Microsoft Entra Connect Sync
Microsoft Entra Connect Sync is the traditional tool used to synchronize on-premises Active Directory identities with Microsoft Entra ID. It enables hybrid identity scenarios by ensuring users can access cloud resources using their existing credentials.
This solution runs as a Windows service on a dedicated server and supports features like password hash sync, pass-through authentication, and federation with AD FS.
However, Connect Sync doesn’t just synchronize user accounts. It also supports syncing groups, devices, contacts, custom attributes, and a lot more, making it a versatile solution for hybrid identity management.
Key Limitations of Connect Sync
While widely adopted, Connect Sync comes with several limitations:
- Infrastructure dependency: A dedicated Windows Server is preferred. This increases operational overhead and maintenance.
- On-Prem Footprint: The installation brings several dependencies, including:
- SQL Server LocalDB for storing sync configuration and operational data.
- Microsoft Authentication Library (MSAL) for secure communication with Entra ID.
- Microsoft Visual C++ Redistributables, PowerShell modules, and .NET Framework components.
- These dependencies require patching, monitoring, and lifecycle management.
- Updates and Monitoring: Version upgrades and health monitoring require administrative effort and are not cloud-managed.
- High Availability Setup: Redundancy and failover require manual configuration. While multiple Entra Connect Sync servers can be deployed in staging mode, only one instance can be active at a time. If the active server fails, promoting a staging server to active must be done manually, which can introduce delays and operational overhead.
- No disconnected multi-forest support: Handling multiple forests can be complex and requires careful planning.
Microsoft Entra Cloud Sync
Microsoft Entra Cloud Sync is a modern, lightweight identity synchronization solution designed to simplify hybrid identity management. Unlike Connect Sync, Cloud Sync doesn’t require a dedicated server, it uses a cloud-managed agent that runs on any domain-joined machine, reducing infrastructure overhead and streamlining deployment.
Key Benefits of Cloud Sync
- Lightweight architecture: No need for a full server installation—just deploy the agent and configure from the cloud.
- Disconnected multi-forest support: Natively supports syncing from multiple Active Directory forests without requiring trusts between them.
- High Availability: Cloud Sync allows you to deploy multiple agents that operate in active mode simultaneously. There’s no concept of primary and staging agents, each agent can handle synchronization independently, providing built-in redundancy and improved resilience without manual failover steps.
What Cloud Sync doesn’t support
While Cloud Sync offers a multiple advantages over Entra Connect Sync, it also comes with some limitations:
- Device Synchronization: Cloud Sync does not support syncing on-premises device objects to Entra ID. This is required for Entra hybrid-joined devices, a setup that Microsoft now discourages for long-term strategies in favor of cloud-native alternatives (see banner from official docs below).

- Pass-Through Authentication (PTA): Unlike Connect Sync, Cloud Sync does not support PTA. It relies on password hash sync for authentication. AD FS is still supported, but Microsoft strongly suggests to move away from that technology.
- Filtering on Attribute Values: Cloud Sync supports basic filtering, but it lacks advanced filtering based on specific attribute values.
- Device Writeback: Not supported. However, Cloud Sync does support Cloud Kerberos Trust, which enables authentication to on-premises resources from Entra-joined devices.
- Entra Domain Services Integration: Cloud Sync cannot be used with Entra Domain Services.
- Large Group Memberships: Cloud Sync has limitations when syncing groups with a very large number of members, with a maximum supported members set to 50,000.
Choosing Between Connect Sync and Cloud Sync
Choosing the right synchronization method depends on your organization’s infrastructure, identity requirements, and long-term strategy. Both Connect Sync and Cloud Sync have their strengths, but they serve different use cases.
Here are some key considerations:
- Use Connect Sync if:
- You need to sync device objects for hybrid-join scenarios.
- You require Pass-Through Authentication (PTA).
- You rely on advanced filtering based on attribute values.
- You need device writeback or integration with Entra Domain Services.
- Your environment includes complex multi-forest setups with custom sync rules.
- Use Cloud Sync if:
- You prefer a lightweight, cloud-managed solution with minimal infrastructure.
- You need disconnected multi-forest support without complex configuration.
- You’re aiming for a cloud-first strategy and don’t rely on legacy hybrid join features.
- You want built-in high availability with multiple active agents.
Note
For a detailed evaluation, Microsoft provides a very helpful wizard at aka.ms/EvaluateSyncOptions.
Here is an overview about how to use the tool:
- From the top right, choose Sign in if you’re an admin option.

- You will be redirected to the Microsoft 365 admin center.
- Select the Check sync tool option, and check the scenarios that apply to your environment.
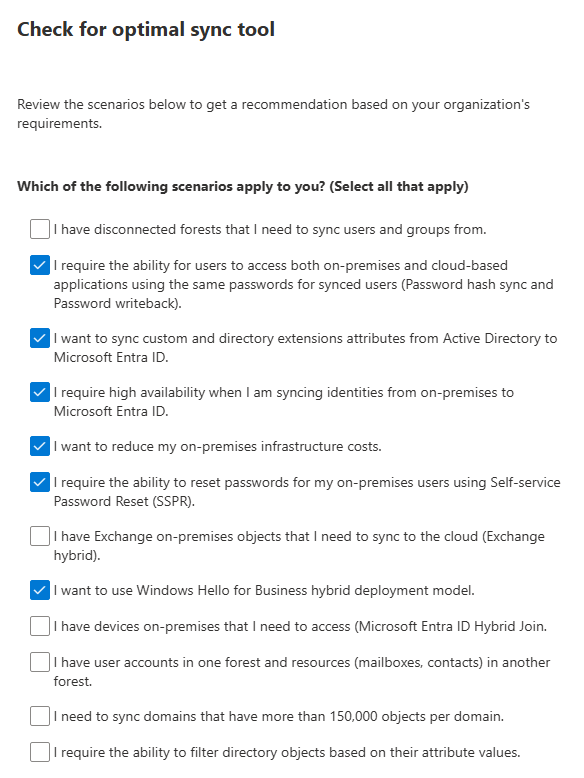
- At the bottom of the pane, you’ll see the suggested synchronization tool for your environment, based on the scenarios you wanted to cover.

Step-by-step migration
Below is a simplified step-by-step guide to help you plan and execute the migration from Entra Connect Sync to Cloud Sync effectively.
Prerequisites
- An Enterprise Administrator or a Domain Administrator in Active Directory Domain Services to operate in Entra Connect Sync and Cloud Sync.
- A user with the Hybrid Identity Administrator (recommended) or Global Administrator role assigned in Entra ID.
- A Windows Server 2016, 2019 or 2022 domain-joined machine. Currently, as of November 2025, Windows Server 2025 is not yet supported.
- If you implemented the Active Directory tiering model, the Cloud Sync provisioning agent should be installed in a Tier0 machine.
Back up current Entra Connect Sync configuration
- Connect to one of your current Entra Connect Sync servers.
- Open Entra Connect Sync and select Configure.
- Select “View or export current configuration”.
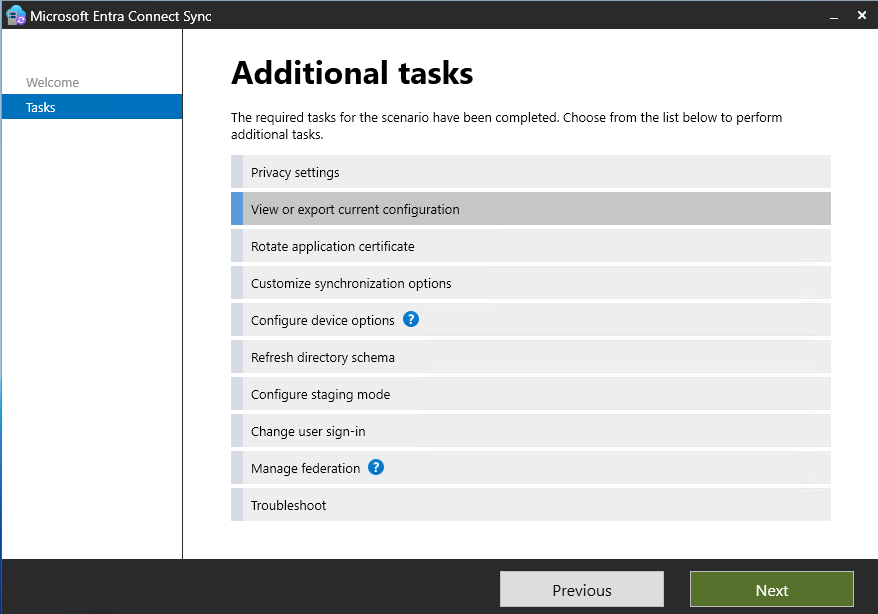
- Select Export Settings. You’ll be prompted to choose a location to save a JSON file containing your current sync configuration.
- Return to the previous step and select “Customize synchronization options”.
- Provide the credentials of your Hybrid Identity Administrator or Global Administrator user.
- Go to the “Domain and OU filtering” page. Here, review which OUs sync to Entra ID.
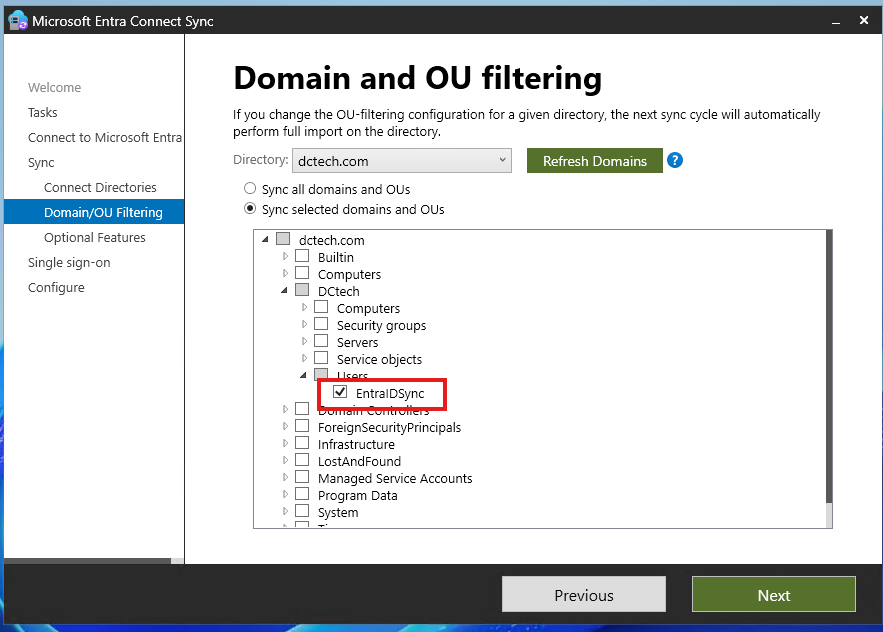
- Exit the Entra Connect Sync wizard.
Prepare the pilot group of users
It’s always suggested to sync a pilot group of users (maybe test users) before migrating all users to the new synchronization method.
- Open Active Directory Users and Computers (dsa.msc) and create a new Organizational Unit (OU). In this OU you will move your pilot users.
Warning
If the new Organizational Unit (OU) is placed under an existing OU that is already included in Entra Connect Sync, users moved into it will continue to sync without issues. However, if the new OU is outside the current sync scope, those users will no longer be synced and will enter a soft-deleted state in Entra ID.
Important: Moving users outside of the sync scope is not recommended, as it triggers soft-deletion in Entra ID, potentially causing service disruption. Moreover, this step is not required to prevent users from being synced by Entra Connect Sync. It is sufficient to configure filtering rules that disable export of changes for specific users, allowing a safer and more controlled transition to Entra Cloud Sync.

Configure filtering rules to exclude the pilot group of users from syncing. Follow the steps outlined below to set up these filters.
- On the server running Entra Connect Sync, open PowerShell with administrative privileges.
- Run the following commands. These will stop the sync scheduler and set it to disabled:
Stop-ADSyncSyncCycle
Set-ADSyncScheduler -SyncCycleEnabled $false
- From the Start menu on the server, under Microsoft Entra Connect Sync / AzureAD Connect, open the Synchronization Rules Editor.
- Make sure you have selected the Inbound rules, and then add a new rule.

- In the page that opens provide the following information:
- Name of the rule
- Connected System: select your Active Directory connector from the dropdown
- Connected System Object Type: user
- Metaverse Object Type: person
- Link Type: Join
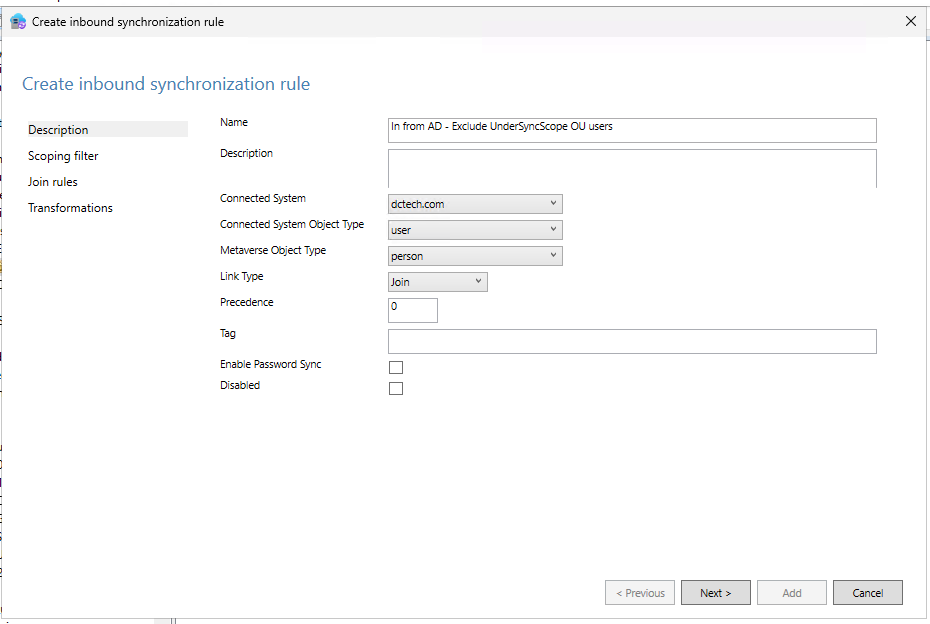
- Proceed to the next page. Under Scoping Filters, you’ll need to add the DistinguishedName of the Active Directory OU where your pilot users are located. This ensures Entra Connect Sync can correctly apply filtering rules based on the OU. To find the DistinguishedName of your OU, go back to Active Directory Users and Groups (dsa.msc) and right-click on your OU. Select Properties and the Attribute editor. Locate the DistinguishedName attribute and copy its value. Populate the Scoping Filters in Sync Rules Editor accordingly (value below is referred to the demo environment of the previous pictures):
| Attribute | Operator | Value |
|---|---|---|
| dn | ENDSWITH | OU=UnderSyncScope,OU=EntraIDSync,OU=Users,OU=DCtech,DC=dctech,DC=com |
- On the next page, Join rules, leave empty.
- On the Transformations page, configure as follows:

- Save the rule.
- Back to the Synchronization Rules Editor homepage, choose Outbound as Direction, and create a new rule.
- In the page that opens provide the following information:
- Name of the rule
- Connected System: select your Entra ID connector from the dropdown
- Connected System Object Type: user
- Metaverse Object Type: person
- Link Type: JoinNoFlow
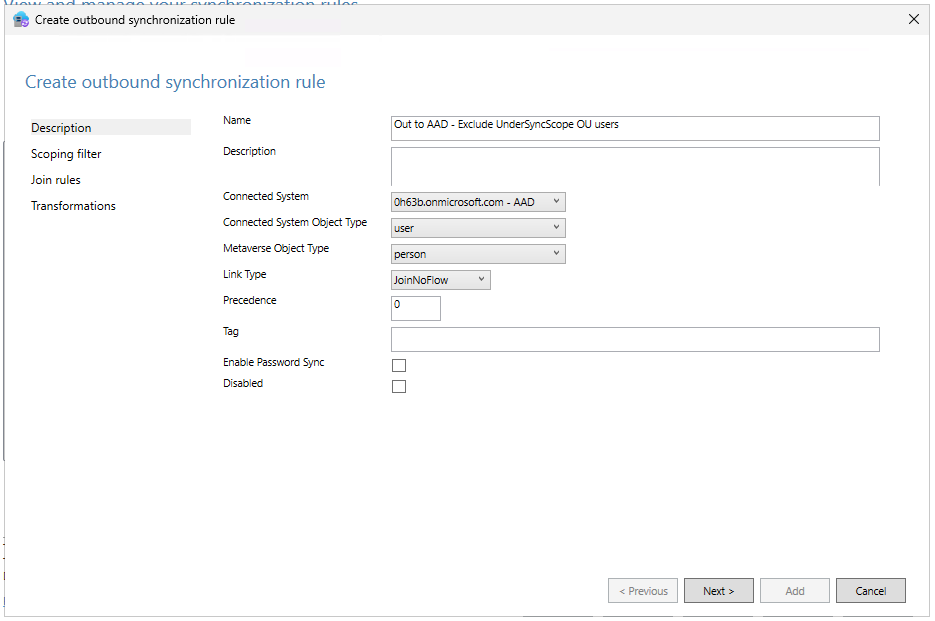
- In the next page, Scoping filter, and the following:
| Attribute | Operator | Value |
|---|---|---|
| cloudNoFlow | EQUAL | True |
- Proceed trough the wizard with the default settings and add the rule.
First, we created an inbound synchronization rule that tags users in the target OU with the cloudNoFlow attribute. Then, we added an outbound rule to prevent these tagged users from being exported from the metaverse to Entra ID.

Tip
After configuring filtering rules to block exports in Entra Connect Sync, existing users remain in Entra ID, but changes to their attributes won’t sync. New users matching the filter criteria will not be synced at all.
You should test the correct behavior by updating an existing user and creating a new one under the filtered scope, and verify that no updates are synced to Entra ID.
Install the Cloud Sync provisioning agent
This is the only component that installs locally. The process is quick and straightforward, typically taking just a few minutes.
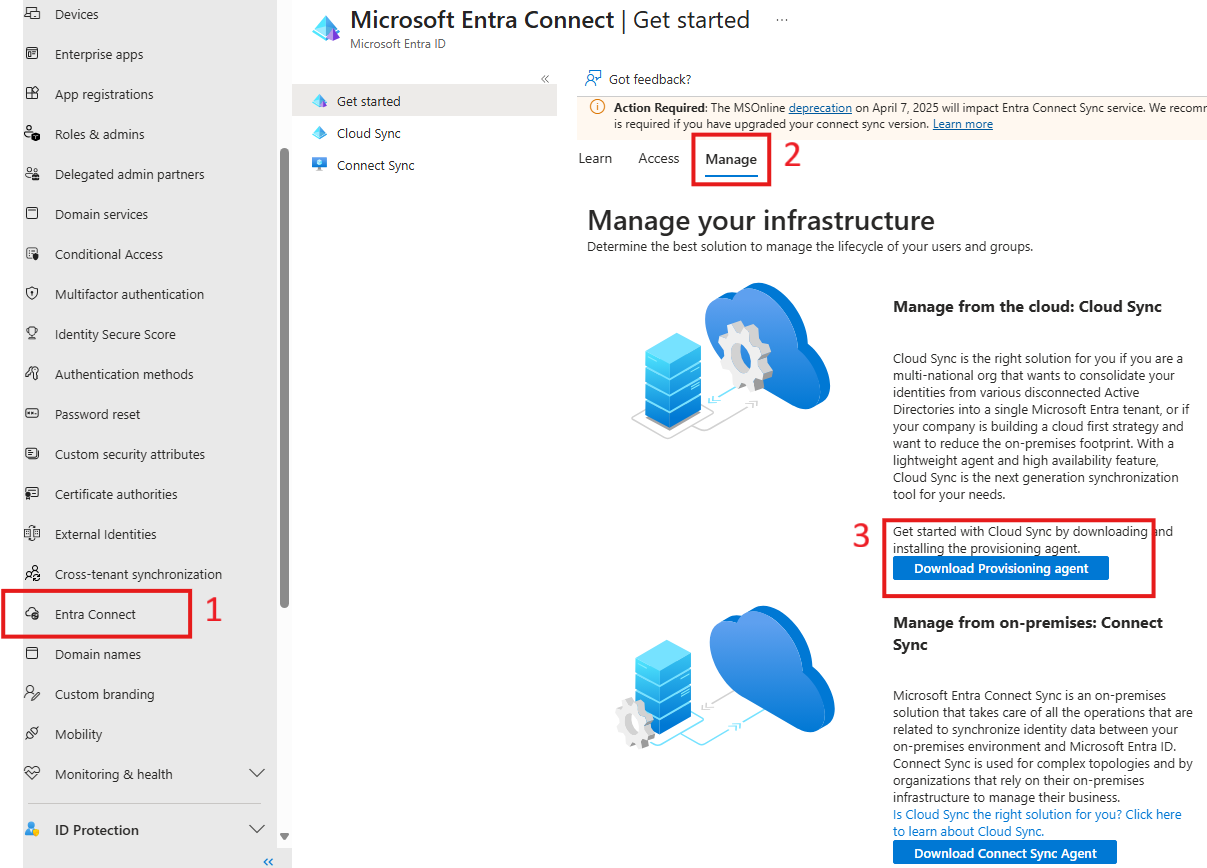
- Login to Entra admin center and select Entra Connect.
- From the overview page, open the Manage blade.
- Click on Download Provisioning agent button.
- Copy the agent installer to the VM where you want to install it. It’s not required to install Cloud Sync on a Domain Controller.
- Run the installer on the designated machine. You simply need to press the Install button.
- Once installed, the agent configuration wizard starts.
- In the first page, leave the Connect to your Active Directory domain(s) checkbox enabled and go to the next page.
- In the Connect Microsoft Entra ID page, provide the credentials of a Global Administrator or Hybrid Identity Administrator and authenticate.
- In the next page you’re prompted to choose if you want to use an existing group Managed Service Account (gMSA) or create a new one.
Info
A Group Managed Service Account (gMSA) in AD DS is a secure service account type used to run services without manual password management. It supports automatic password rotation and is restricted to Kerberos authentication only, NTLM is disabled. The password hash is never stored in memory, reducing the risk of credential theft. Only machines that are members of the security group associated with the gMSA are authorized to retrieve and use its credentials.
In our case, we opt to let the wizard create the gMSA and its components for us. For this, we provide the credentials of a Domain Admin and proceed.
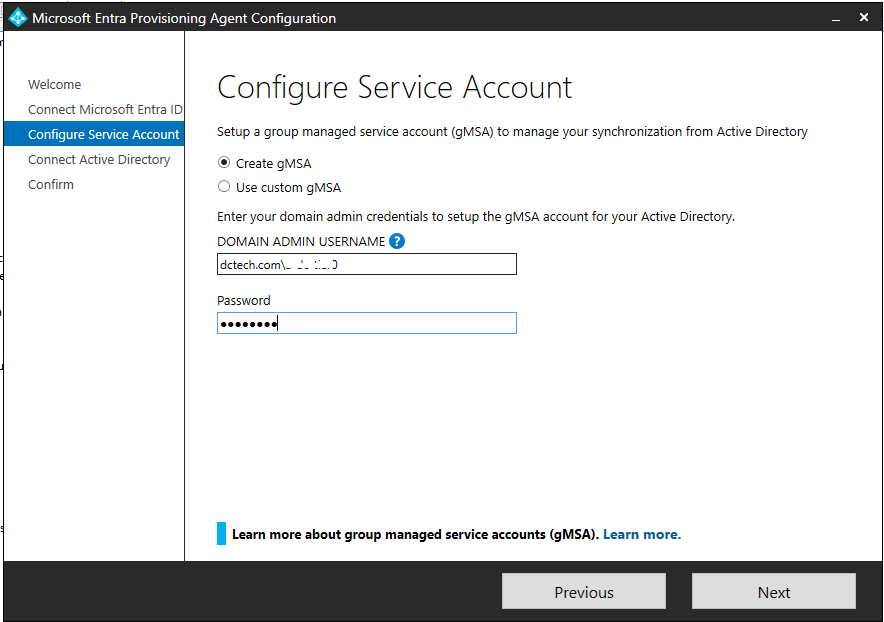
In the next page, make sure your domain is shown in the Configured domains section, otherwise add it. The click Next.
This is the last page of the wizard. Confirm the configuration and wait for it to finish.
Once the wizard finished configuring the agent, you can also verify that the gMSA has been successfully created in AD.

Configure Cloud Sync
As previously mentioned, Entra Cloud Sync is configured entirely within the Microsoft Entra portal. This means no local configuration is required, aside from the installation and setup of the provisioning agent, which we covered in the previous section.
Login to Entra admin center and select Entra Connect from the left column menu.
Select Cloud Sync.
Navigate to the Agents section. You should see your recently installed provisioning agent listed as active, confirming that it’s successfully registered and ready to use.

Back to the Configurations section, select New configuration and choose AD to Microsoft Entra ID sync.
You will see your AD domain namespace listed. Leave the Enable password has sync checkbox enabled and create the new configuration. The process can take a few minutes.
Note
When you create a new configuration, it will initially appear with the status Disabled. You’ll need to review and explicitly enable it before synchronization begins.
Inside the newly created configuration, go to Scoping filters. Choose Selected organizational units, then paste the Distinguished Name (DN) of the Active Directory OU that contains the users you want to sync. Don’t forget to click Add to apply the filter.
Note: It’s generally not recommended to sync all users. Scoping helps limit synchronization to only the relevant accounts, improving performance and security.

Add all the OUs you need to sync, and then save.
Under the section Attribute mapping you should verify that the AD DS object’s attributes are mapped correctly to the Entra ID objects. Note that for each attribute you can change the mapping, and that each mapping type can be:
- None: Leaves the target attribute in Entra ID unchanged, so the source attribute from AD is not synced. However, if the target attribute is empty, you can specify a default value to populate it during synchronization.
- Direct: Synchronizes a specific attribute from your on-premises Active Directory to the corresponding attribute in Entra ID. If the source attribute has a value, it will overwrite or populate the target attribute in Entra ID. If the source is empty, you can optionally define a default value to be used instead.
- Constant: The target attribute is set to a fixed string value that you define. This is useful for setting static values.
- Expression: Uses a script-like expression to compute the value of the target attribute. It’s ideal for complex transformations, such as combining multiple attributes or formatting strings. You can use the Expression Builder to help building these expressions.
Before enabling the configuration, it’s a good idea to manually provision a user within the defined sync scope to verify that everything is working as expected. This allows you to confirm that the provisioning agent and scoping filters are correctly set up before initiating full synchronization.
- Inside the Cloud Sync configuration, select Provision on demand.
- Then paste the Distinguished Name (DN) of the user you want to sync. This should be one of the users that are filtered out of Entra Connect Sync scope.

- If everything has been set up correctly, the user should be synced without any issues.
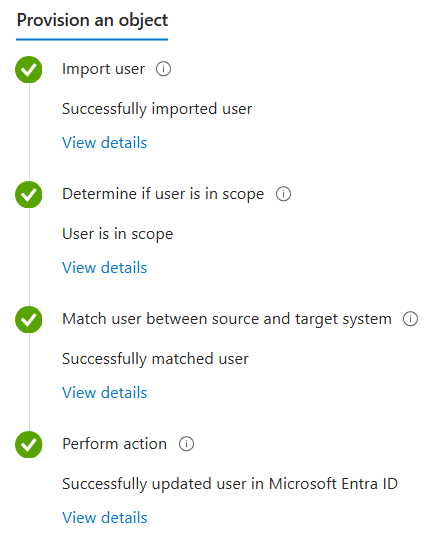
As a final step, return to the configuration overview and click Review and enable to activate the sync configuration. This will trigger periodic synchronization, ensuring that changes in your scoped Active Directory objects are regularly reflected in Microsoft Entra ID.
Final steps
Once the pilot group has been successfully verified and synchronization is working as expected, you can proceed to migrate the remaining users to Entra Cloud Sync.
After the full migration, it’s recommended to disable Entra Connect Sync, as per Microsoft’s best practices. This pause allows you to monitor Cloud Sync behavior and ensure stability before fully decommissioning Entra Connect Sync.
Info
Running Entra Cloud Sync and Entra Connect Sync side-by-side is a supported configuration, as long as they are not exporting changes for the same scope of objects.
This setup is commonly used in hybrid environments where certain features, such as device synchronization, are still required. In such cases, Cloud Sync can handle user synchronization while Connect Sync continues to manage unsupported scenarios.
FAQ
There are two ways to initiate synchronization in Microsoft Entra Cloud Sync:
- To perform a full (initial) sync, use the Restart provisioning button available in the configuration overview within the Entra portal. This reprocesses all scoped objects from scratch.
- To immediately sync changes for a specific user, or to provision a newly added user, use the Provision on demand feature.
Unlike Entra Connect Sync, Cloud Sync does not support manually triggering a delta sync. Sync cycles run automatically at regular intervals.
- User and group synchronization runs approximately every 10 to 20 minutes.
- Password hash synchronization occurs more frequently, typically every 2 to 5 minutes.
The actual time it takes to complete a sync depends on the volume of changes. Larger batches may take longer, while smaller ones finish more quickly. This schedule is managed automatically by the Entra provisioning service.
You can view synchronization logs directly within your Cloud Sync configuration in the Microsoft Entra admin center:
- From the configuration overview, click on Sync status info.
- This section displays details about the last synchronization times for both password hash sync and user/group sync, helping you monitor the health and timing of sync operations.
Yes, administrators do receive email notifications when there are issues with password hash synchronization or user and group synchronization in Microsoft Entra Cloud Sync, similar to how it works with Entra Connect Sync. These alerts also inform admins when the issue has been resolved.
Conclusion
Choosing the right identity synchronization method is essential for building a secure and efficient hybrid environment. While Entra Connect Sync offers deep customization and legacy support, Cloud Sync brings simplicity, scalability, and cloud-native management. By understanding their differences and evaluating your organization’s needs, you can make an informed decision, and if needed, follow a structured migration path toward a more modern identity infrastructure.
References & Resources
- What is Microsoft Entra Cloud Sync? - Microsoft Entra ID | Microsoft Learn
- Comparision on Azure Cloud Sync and Traditional Entra connect Sync. | Microsoft Community Hub
- Migrate Microsoft Entra Connect to Microsoft Entra Cloud Sync - Microsoft Entra ID | Microsoft Learn
- Microsoft Entra Cloud Sync FAQ - Microsoft Entra ID | Microsoft Learn
